Showing posts with label chocolate. Show all posts

Chocolate Shortbread Valentine Cookies


I love Valentine's Day! So fun! So much prettiness and love and sugar!  I have written about my adoration of this holiday in years past and have shared some of my favorite traditions, recipes and treats 
HERE and HERE and HERE 
So, I will refrain from repeating myself and will make this a short post.  

In my home (and my home growing up) Valentine's was a fun holiday not a romantic, "Hallmark", pressure-filled holiday.  It's a day to say "I LOVE YOU" to people you adore- friends, family, co-workers, neighbors.  

Heart garland- fun to make and have love draping from your ceiling! My
friend Connie made this one for me several birthdays ago and I
bring it out each year!


Valentine BINGO played with conversation hearts

Meringue Cookies- heart shaped! 
I usually make heart cut out cookies because they are so pretty and delicious and lovely.  Hearts are my favorite cookie cutter shape and the easiest to frost, in my opinion. 
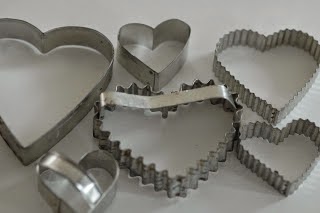
 I sometimes make sugar cookies or these linzer shortbread cookies.


If you are more in the chocolate mood, these chocolate shortbread cookies are a treat!  

They are soft and like a thin brownie!  

The dough is just a few ingredients that you mix together.

They are easy and fun to ice.


After a bit of refrigeration, the dough is easy to cut out.


Here's the recipe:


from Everyday Food- Martha Stewart
1/2 cup (1 stick) unsalted butter, room temperature
3/4 cup all-purpose flour
1/2 cup powdered sugar
3 Tbsp. unsweetened cocoa powder

Preheat oven to 300 degrees.  With an electric mixer, beat butter until creamy.  Add flour, sugar and cocoa; mix just until combined.  (Chill dough in refrigerator for 10 minutes or more…if you chill it for longer, set out to soften a bit before rolling as it becomes hard in the refrigerator with all of that butter!)

Pat dough onto a flat surface and roll out (using a dusting of powdered sugar or flour to keep from sticking). Cut with cookie cutter into hearts (or desired shape). Place on cookie sheet (I line mine with parchment for easy clean up and no sticking). Bake 10-12 minutes until firm but not crispy.  
Cool completely and then frost as you wish. (See below for ideas)


1. Ice with a simple glaze-
I scooped 1/2 cup powdered sugar, a heaping Tbsp cocoa powder, a few drops of vanilla extract in a small bowl, stirred and added drops of water until it was smooth and thin, but not too thin. Spread on cookies with a spoon.  Add sprinkles while they are still wet.
Or
2.  Melt melting chocolate wafers (I use the Ghirardelli brand) and dip the cookies (half or entire cookie) adding sprinkles while still wet.  
Or
3.  I had some buttercream frosting left over from making a Giant Chocolate Chip Cookie Cake and decided to make sandwich cookies (inspired by the double-doozie cookies at the cookie store)

I think the key is frosting them in a way that makes them easy to stack and package for giving away! The sprinkles provide a nice barrier to cookies which keep them from sticking to each other. 


Bake some lovely goodies, write a kind note, make something pretty, bring warmth to this wintry month, share your adoration with someone! 


A Go-To Peanut Butter Chocolate Blondie Recipe & Gearing Up for Summer


Next week is the last week of school for my kids and I am trying to gear up for summer.  I have to admit that at this point in the calendar, after an intensely packed school year for me and my kids, I just want to sit on the porch, read books and drink lemonade for the next 2 months.

However, the reality is that my gang needs me to be a cruise director rather than a checked-out mom.   I start to have flash backs to Julie McCoy from The Love Boat.  (Or was this before your time?)
Thinking through and trying to create a strategy for managing (and maximizing) long summer days has become an annual ritual of mine. As I looked back at my post this week last year, I saw that I wrote about this AND the Chewy M & M bars that I had just discovered.  I can't tell you how many times I have made them in the past year, since that post! They were on heavy rotation in my kitchen.

Recently, I have added another bar cookie to my Go-To list. A few weeks ago, I was looking to make an easy but delicious dessert for small group in honor of Caroline's love of peanut butter and chocolate.  I found this one online, and it far exceeded my hopes.  It is gooey, just the right amount of peanut buttery and chocolatey, and is a bar which I love - as it is so easy!  It's made with things I had on hand, and is a cinch to whip up.

On days when I need to make a treat for a party, or a picnic, or a get together this summer, these Peanut Butter Chocolate Blondies are a good bet.

(I found the recipe on a blog and it made a small batch- which I wasn't expecting because her pan was rectangular and it threw me off- since I am used to a small batch being in a 9 X 9 pan.  I quickly doubled the recipe and made the large batch (9 X13 pan) for the crowd I was serving.  I have included ingredient measurements below for both sizes, as you might need the big for a crowd or might want a small batch if you are just making them for yourself- as they are hard to stop eating!)


Peanut Butter Chocolate Blondies
borrowed from The Sweet Talker (who borrowed from Two Tiny Kitchens)

(for a 9 X 13 pan)
1 cup peanut butter butter (I used natural- it made them nice and gooey; and you can use
 creamy or crunchy- your preference!)
2/3 cup butter, softened
1 1/3 cup white sugar
1 cup packed brown sugar
4 eggs
1 teaspoon vanilla
2 cups all-purpose flour
2 tsp. baking powder
½ tsp. salt
2 cups chocolate chips

\\\\\\\\\\\\\\\\\\\\\\\\\\\\\\\\\\\\\\\\\\\\\\\\\\\\\\\\\\\\\\\\\\\\\\\\\

(or for an 8 X 8 pan …so you don’t have to do the division J)
1/2 cup peanut butter (I used natural- it made them nice and gooey; and you can use creamy
 or crunchy- your preference!)
1/3 cup butter, softened
2/3 cup white sugar
1/2 cup packed brown sugar
2 eggs
1/2 teaspoon vanilla
1 cup all-purpose flour
1 teaspoon baking powder
1/4 teaspoon salt
1 cup chocolate chips

///////////////////////////////////////////////////////////

Preheat oven to 350˚. Grease baking pan.
In a medium bowl, cream together peanut butter and softened butter. 
Gradually blend in the brown sugar, white sugar, eggs, and vanilla; mix until fluffy. 
Combine flour, baking powder, and salt; stir into the peanut butter mixture until well blended.  
Fold in chocolate chips.
Bake for 30 minutes in preheated oven, or until the top springs back when touched. Don’t over bake!
Cool, and cut into squares.

Of course, feel free to add in other treats- like coconut, or Reese’s pieces, or M & Ms, or nuts into the batter.


So, in addition to making these bars and eating them, I'm working on a summer strategy for reading, projects, filling our days with productive, seasonal, relaxing and connecting things.  I am asking my friends with kids for good ideas to help with this. I used a punch card system last year that worked pretty well for my people.  My sister is working on this list of "optional activities" for summer that I am trying to figure out how to best mobilize into action.

I'm looking for a "summer central" type of spot in my house to post our plans/ideas/etc. Maybe the laundry room…or clear off the refrigerator and do it there?

We are also making a Summer Bucket List of things we want to do this summer including:
making lots of variety of popsicles and ice cream (more posts to come on those),
taking hikes to different trails/parks in the area,
pick fruit from local farms, just to get started.

I have all of these pipe dreams of learning to embroidery, learning how to play Rook as a family, working lots of jigsaw puzzles, doing house projects, and the list goes on.

And I have created my annual summer book stack- ones I need and/or want to read this summer.  I don't know how much of a dent I will make on this, but I am sure gonna try.

(I welcome any of your suggestions for managing the chaos of summer with kiddos!)

Regardless of how we end up ordering our days this summer, one thing is for sure: things will be busy in the  kitchen - with lots of hungry eaters and more time to get creative and try new things! 


S'Mores Treats


Every day has highs and lows.  We usually process these at the dinner table each evening.  And at times the highs are the top stories of the night and other times the lows are more dominant themes, but both seem to always co-exist.  This week was that – a mixed bag– some good moments, some terrible ones.  And that’s okay. 

I want to move through the rough patches and learn what there is to learn from them, but then embrace the joys!  There is a quote in a piece we read for my Spirituality in Social Work class that says, “Don’t obsess about the past, or worry about the future, all you need is right here now.”   I think of this quote often.  It has become somewhat of a mantra for me.  

This week, my friend Emily, who continually inspires me, put this Emerson quote on her blog and it stirred me up.  My heart quickened as I read and it made me crave this! I don’t live like this on most days, but I earnestly desire to. 

“Write it on your heart
that every day is the best day in the year.
He is rich who owns the day, and no one owns the day
who allows it to be invaded with fret and anxiety.
Finish every day and be done with it.
You have done what you could.
Some blunders and absurdities, no doubt crept in.
Forget them as soon as you can, tomorrow is a new day;
begin it well and serenely, with too high a spirit
to be cumbered with your old nonsense.
This new day is too dear,
with its hopes and invitations,
to waste a moment on the yesterdays.”


This weekend, full of activities, ranged from chaos to sweet, and fun to maddening- with weather that matched-  rainy, cold days and a gorgeous sunny day on Saturday.  One of the highlights was these S'Mores Treats that I made – twice, actually.  I made them, along with Banana Pudding and Stop Light Chili for the social work chili supper on Friday night, which is always a fun time.   And then we were going to a neighbor’s house for a Super Bowl gathering and I thought I would take the leftover S'Mores Treats, when I realized there were only a couple left in the container.  Dave confessed to being the culprit and graciously offered to go pick up the ingredients to make another batch.  Which I did.  

They are ridiculously easy... I'm talking 6 minutes. Asher was going to help me make them.  I asked him to wash his hands.  He left the room to wash his hands, must have gotten distracted, came back about 5 minutes later and said, "Where are the ingredients?" And I said, "They are done! I already made them."

They are that fast. Melt, stir, pour, stir, add, stir, dump, press, sprinkle, done!

These bars are like Rice Krispie Treat S'Mores.  My family adores them, which I think is mostly because they love Golden Grahams cereal- which we don’t buy very often.

S'Mores Treats
adapted from Country Clever

6 Tbsp. butter
1 bag (10 oz.) mini marshmallows
1 cup semi-sweet chocolate chips and 1/4 cup for topping
1 box (12 oz.) Golden Graham Cereal
1/2 tsp. Vanilla extract
non-stick cooking spray

You can make this in a pan on the stove top or in a glass bowl in the microwave- it's up to you! Melt butter in pan (or bowl) add marshmallows, stir and continue to heat until melted. (Keep your eye on it, as it can quickly get overdone). Add vanilla. Stir.  Add Golden Grahams and 1 cup chocolate chips.  Stir until well combined and marshmallow goo is fully incorporated into the cereal.  Coat 13 X 9 inch pan lightly with cooking spray.  Dump cereal mixture into the pan and press well.   Place in the refrigerator for 10 minutes or until firm enough to slice.  Slice into bars and serve. 


In the midst of this winter week (cold, dreary, and rainy here in Nashville) will you join me in fighting for joy- joining Emerson's hopeful outlook- that "this new day is too dear,
with its hopes and invitations,
to waste a moment on the yesterdays"?!

Cream Cheese Brownies

I was in an airport last spring headed home from a conference. My colleague and I popped into a shop to grab a magazine, some snacks and a last minute happy to bring our kids before we waited at the gate for our flight.  The "grabbing a magazine" ended up taking a long time, as I was stumped by selecting a magazine. I was over-analyzing my decision, probably because I knew these were the final hours of my trip before I was back to the chaos and non-magazine reading of my real life at home.  The pressure to pick the RIGHT ONE seemed intense. 
 There was a section on fashion. I knew these were not worth the $6 since it would only make me wish for cooler clothes and a thinner body –basically feed discontentment.  So I stepped to the next section, but I knew the fitness magazines would simply make me wish for a better figure and more of a desire to workout to achieve that figure.  Then, I looked for a few minutes at the home magazines, which are typically my favorite.  But I decided they would make me want things in my home that at this point I don't have the budget to buy.  I didn't even walk over to the People magazine genre because I don't care for them.  So, I landed on the recipe magazines. Surprise, surprise. I found this one, which was all brownies and bars.
 It is a special edition of Better Homes and Gardens – so it's more of a cookbook magazine.  I love it. It was a $10 magazine, but really it is a paperback cookbook filled with 120 recipes! I have made a few recipes from it and have on my list to try several more ASAP.


I made these Cream Cheese Brownies and they are as yummy as they are attractive! They possess several qualities I admire in a bar: gooey, complex and pretty!  
They aren't hard but not simple. They require a few steps and a couple of bowls and pans but I think they are worth it.

Cream Cheese Brownies
borrowed from Brownies & Bars (by Better Homes and Gardens)

 for chocolate layer:
8 oz. semisweet chocolate chips (or coarsely chopped bars)
3 Tbsp. butter
4 eggs
1 1/4 cups sugar  
1/3 cup water
2 tsp. vanilla
1 cup all-purpose flour
1 tsp. baking powder
1/4 tsp. salt
3/4 cup chopped toasted pecans (or walnuts)


for cream cheese layer:
1 8 oz. pkg. cream cheese, softened
2/3 cup sugar
2 Tbsp. all-purpose flour
1 Tbsp. lemon juice


Step 1:  In a saucepan cook and stir chocolate and butter over low heat until melted; cool.  Meanwhile, preheat oven to 350 ˚. Line a 13 X 9 inch baking pan with foil, extending the foil over edges of pan.  Grease foil; set aside.
Step 2: In a large mixing bowl, beat 2 eggs with a mixer on medium speed until foamy.  Add the 1 1/4 cups sugar, the water, and 1 tsp. of the vanilla.  Beat on medium speed about 6 minutes or until mixture is slightly thickened and lemon in color.  Beat in chocolate mixture.  Stir in the 1 cup flour, the baking powder, and salt; stir in nuts. Pour half of the batter into the prepared baking pan, spreading evenly.  
Step 3: In a medium bowl beat the remaining two eggs, the remaining 1tsp. vanilla, the cream cheese and the 2/3 cup sugar, the 2 Tbsp. flour, and the lemon juice until smooth.  Carefully spread cream cheese mixture.  Using a table knife, swirl gently to marble. 
Step 4: Bake for 40 minutes or until toothpick inserted comes out clean. Cool in the pan on a wire rack.  Chill about 1 hour.  Using the edges of the foil, lift brownies out of pan. Cut into bars.

Store in refrigerator. 


foil lined pan with overhang
melted chocolate & butter

Toasting pecans
add the nuts to the chocolate
spread in the pan

carefully smooth the cream cheese layer on top
blob remaining chocolate on top

and SWIRL with a knife!
Isn't that amazing?


Tada!

Speaking of magazines, the other night I fell asleep on the sofa as I was taping torn-out magazine pages into my spiral-bound sketch books that I use for my recipe notebooks.  I was thinking about my students who came to my house for the Social Work dinner the other night.  One of them said my house was so "pinterest" which cracked me up because most everything in my house was inspired by a stack of torn out magazine pages, before there was a pinterest.  I call my notebooks "old school pinterest".

Older Post ►
 

Copyright 2011 from my home to yours is proudly powered by blogger.com