Showing posts with label favorite. Show all posts

Chimichurri – I Could Almost Drink It!


Have you experienced Chimichurri? It's an Argentinian Sauce, similar to Pesto, but made with a Parsley base.  If you haven't, you must! It was love at first taste for me.  A couple of years ago we went to Eastland Cafe for dinner with friends. In our life, this is considered special-occasion, high-style dining – since eating out in our world usually does not include table cloths, servers, and low lighting.


(I wrote here about the dilemma I face when upscale dining, regarding the salad and main dish courses.)

I struggle with the fact that meat is typically not my favorite part of the meal, and yet it is seen as the main attraction on most menus.  Everything else is simply building up to this apex.  I had difficulty ordering at Eastland Cafe because of this very dilemma.  So, I opted instead to order a salad and some sides.  I felt good about the decision.  I had fried green tomatoes, a beet-topped green salad, a sweet potato dish and something else that escapes me now.  It was all very tasty.  However, I have to report that the highlight of the meal, for me, was the fresh, warm bread and bowl of chimichurri for dipping that was brought at the beginning of our meal.  Oh my....a party for the taste buds! It was so good, I almost drank it.  This began my love (and pursuit) of chimichurri.

I talked to my creative, culinarily friend Rich about it (who happens to be an amazingly creative photographer as well), because I figured he might have a recipe for it.  This summer, he made it happen.  And it was everything I dreamed it to be! He served it poured over grilled flank steak and it was a hit. We all, including the kids, went crazy (Asher went a little crazier than the other kids, but they all loved it). We served it with roasted vegetables, braised purple cabbage and crusty bread.  During the meal we felt compelled to pour the chimichurri over the veggies and dip our bread into it.

We made it the other night and I was able to take a few photos to share with you.  We had a few tablespoons of the chimichurri left.  I saved it.  (If you know me you are not surprised by this). We had some left over pasta noodles in the fridge, so the next day I tossed them together and Shazam! a tasty lunch.  It's delicious on any meat, fish or vegetables.


borrowed from Simply Recipes

1 cup firmly packed fresh flat-leaf parsley, trimmed of thick stems
3-4 garlic cloves
2 Tbsp. fresh oregano leaves (can substitute 2 tsp. dried oregano)
1/2 cup olive oil
2 Tbsp red wine vinegar
1 tsp. coarse salt
1/4 tsp. freshly ground black pepper
1/4 tsp. red pepper flakes

Finely chop the parsley, fresh oregano, and garlic (or process in a food processor several pulses). Place in a small bowl.


Stir the olive oil, vinegar, salt, pepper, and red pepper flakes in a measuring cup.  Adjust seasoning to taste. Pour oil mixture over parsley mixture and stir until well combined.


Serve immediately or refrigerate.  If chilled, return to room temperature before serving.  Can keep for a day or two.

Flank Steak

Flank Steak
Salt and Pepper
Lemon juice
Worcestershire Sauce

Pat meat dry. Sprinkle generously with coarse salt and fresh ground pepper (on both sides).  Dash  Worcestershire Sauce and the juice of a lemon over it (on both sides).
Cook on heated grill over high heat to sear it.  Do not overcook it. 
Rich says the rarer the better.


Chimichurri is so simple.  It takes only a few minutes to make and yet it can transform a meal.

Which, by the way, simple, delicious recipes like this create somewhat of a problem in my life.  Being the tightwad that I am, and loving really tasty food it is hard for me to justify paying $25 for dinner, when it can be made simply at home for a fraction of the cost! And you get to have leftovers! (Not to mention you can do this while wearing your sweat pants).


Cracked Out on Cracker Toffee


I have cooked several things lately that I am excited to share with you: Pulled BBQ,  Black Bean Torte,  Homemade Sushi, Chicken Salad, Rosemary Parmesan Muffins and thick French Toast, to name a few.  I was deliberating about which should be this week's post and then Cracker Toffee (A.K.A. Crack) resurfaced in my life and I can't stop thinking about it.  It quickly rose to the top of the "to post" list, when my co-worker Patsy asked for the recipe.  So, here's what happened: I innocently went to a baby shower last week for my friend Stephanie.  I knew the treats being served would be delicious, as the hosts are all great cooks.  And then I saw it. There on the serving table was one of my favorite confections: Cracker Toffee.  I love it and haven't had it in a long time! I ate one piece, and a slice of poundcake with Strawberry Coulis, along with caramel corn, and banana pudding adorably served in repurposed glass baby food jars.


As people were leaving, Gretchen (the host) had plastic bags for people to pack up goodies to take with them.  Of course, I obliged and took a couple of toffee bars, thinking I would share them with my family. But somehow that never happened.  Later that night I ate one for a "midnight snack", and broke off a piece of the other one during breakfast the next morning and inhaled the rest of that broken one with my lunch.  I then went to the store to buy the ingredients I was lacking to make some at home.  I was already planning for our social work dinner on Friday, where I was going to make Chocolate Chip Cream Cheese Bars and I thought, with the big crowd we were expecting,  it might be good to make an additional treat.  I immediately thought of the Cracker Toffee Bars.  They are easy, would surely be a crowd pleaser, and would give me an excuse to make them!  There are many versions of these.  As I looked through cookbooks and did online searches, I determined that no two recipes looked alike and yet you really just can't go wrong.  I mean: butter, sugar, crackers, toffee, chocolate, nuts.  Yum, yum or yum – any way you choose.

This recipe is adapted from Martha Stewart's version, since that's the recipe Gretchen used.  You can't go wrong starting with Martha. Hers are called salted toffee chocolate squares. She uses graham crackers as the base, other recipes use Saltines.  I think I prefer Saltine crackers, because the salty cracker gives it such a nice salty/sweet taste and great texture.

Crack might be the right description of this treat.  It really is highly addictive, not good for you, and is euphoric.  Crack-like, you know? (I don't technically know from experience, just from what I've heard and read.) However, this dessert is not illegal and won't ruin you, or send you into a life of crime, or land you in jail like Crack Crack will.

So I made it.  It's easy and pretty and yummy.  We all loved it.  My co-workers especially.  My co-worker Lorraina, who is able to resist desserts with her great willpower, said it looked so appealing that she couldn't resist.  After eating a piece she told me she loved me for it.  Debbie and Patsy both ate it with affirming nods and moans.

My co-worker, Patsy, loved them enough to ask for the recipe the next day.  To which Lorraina replied, DO NOT give me the recipe... I need to NOT have the recipe!  A few minutes later, when Patsy and I were talking about variations we could make, Lorraina swung back into the conversation and said, "while I was not thinking about those bars, I thought coconut might be a nice addition".  I agree wholeheartedly.

So, I guess it would be responsible to provide a warning alongside the recipe.
WARNING: THIS TOFFEE IS HIGHLY ADDICTIVE AND SHOULD BE EATEN WITH CAUTION.

Now that I have done my due diligence to warn you, here is the recipe:
Cracker Toffee
48 saltine crackers (or enough to cover a large baking sheet in one layer) [you can use graham crackers if you would rather have a sweeter base]
1 bag (8 ounces) toffee bits (you can use the ones with chocolate on them or without)
1½ cups coarsely chopped natural sliced almonds, toasted
½ cup sugar
1 cup (2 sticks) unsalted butter (or use salted butter and reduce the amount of coarse salt for sprinkling)
1 cup semi-sweet chocolate chips 
½ teaspoon coarse salt
Coarsely chop almonds


toast for a few minutes (until they begin to turn golden)
Line a rimmed baking sheet with foil. Place crackers in a single layer on sheet, edges touching


Sprinkle toffee bits and almonds over crackers
bring sugar and butter to a boil over medium-high heat –
Reduce heat and cook at a rapid simmer, swirling pan occasionally, until mixture is syrupy (thicker), 2 minutes
Immediately pour over crackers and bake


Remove from oven and immediately sprinkle chocolate chips and a little coarse salt over crackers
Cool, slice and break apart into pieces


Preheat oven to 350.
Coarsely chop almonds. Place on a baking sheet and toast for a few minutes (until they begin to turn golden).
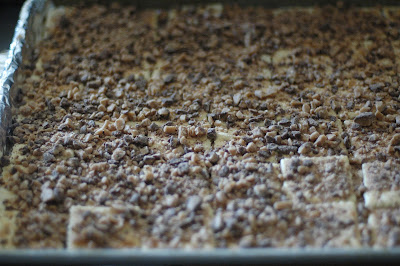
Line a rimmed baking sheet with foil. Place crackers in a single layer on sheet, edges touching. Sprinkle toffee bits and almonds over crackers.
 In a small saucepan, bring sugar and butter to a boil over medium-high heat. Reduce heat and cook at a rapid simmer, swirling pan occasionally, until mixture is syrupy (thicker), 2 minutes. Immediately pour over crackers.
 Bake until liquid topping is bubbling, 12 minutes. Remove from oven and immediately sprinkle chocolate and a little coarse salt over crackers.
 With a sharp knife or pizza cutter, cut into 2-inch squares. Let cool completely on sheet on a wire rack. OR Let cool completely and then break (or cut) into pieces. Store in an airtight container, up to 1 week… if they aren’t gobbled up before then.


TIPS:
*I was trying to speed the cooling process along and decided to put it in the refrigerator to cool.  The challenge was that the chocolate chips hadn't bonded into the bars enough at that point and some of them broke free when I cut them. So, it would be best to cool on the counter.

*You can use the toffee bits with or without chocolate-
I used chocolate covered because that's what was available at the store, but either would be great.

*Patsy and I want to try making them with mini chocolate chips...for more chocolate in every bite! 

*Make them when you can give some away or serve them at an event,  so that they don't take you down. 

That Yummy Vegetable Pasta Thing


I have to be honest.  There is no recipe for this dish.  There's not even a name for it.  It's that simple and that versatile, and hard to pin down.  It's really a matter of opinion, and available ingredients and feel. 

There seem to be people who really prefer written recipes.  They want a detailed recipe with measurements and exact baking times.  I get this.  I really like a recipe.  One time I asked my mom for a broccoli cheddar soup recipe and she handed me a page that had a collage of 3 different broccoli soup recipes taped to one sheet of paper! It overwhelmed me.  I needed ONE.  The perfect one, preferably.  To which she replied, "Well, really the one I make is more of a combination of  #1 and #2, and then when I don't have all of those ingredients, I use the #3 (and tweak it a little)!" Clearly, written recipes are sometimes the way to go.

And then there are some people who don't really use written recipes.  They just add a little of this and a pinch of that.  They might even feel like recipes are restricting!  They want freedom.  Because of this, they can't easily share recipes.  It's not that they are being selfish or mysterious, it's that they don't have a recipe written down.  They just "feel" their way through the recipe and it may change with each time they prepare the dish.  

In An Everlasting Meal, (which I mentioned a couple of weeks ago), the author Tamar Adler writes about using our senses to assist in cooking. She talks about using your sight, taste, touch, smell and hearing in the kitchen.  She writes,

"You must taste and taste.  Taste everything and often.  Taste even if you're scared...  

Listen as though you could cook something just by hearing it...

When you touch the food you cook, you develop intelligence in your fingertips.  I cook mostly with my hands:  they're calibrated, by now, to turn things at the right moments, to choose correct amounts of salt."

I love this idea.  I do think my hands are calibrated to cooking certain dishes.  

On the spectrum of recipe-following, I probably land somewhere in the middle.  I'm best with a good, clear recipe to start with and then after I become acquainted with the recipe, I like to substitute, or add-in, or alter here and there.  
This recipe is one that I created a few months ago and keep changing it a little each time I make it.  I look in the kitchen and see what short pasta i have, and what veggies and cheese I have, and then I create something.  

Dave has been urging me to post this "recipe", because he thinks it is such a winner, and wants YOU to make it too.  I have hesitated because it feels too loose of a recipe to write out.  And it doesn't even have a name – as I have changed the name of the dish each time I've made it, depending on what ingredients I've used.  It can be served hot or cold or room temperature.  That makes it confusing as to whether it is a side dish, or pasta salad.

So, live in freedom, make it like you want and call it what you like.

Use your senses to make this recipe your own.  Roast the vegetables to where they look, smell, and feel right.  Cook the pasta until, when touched or tasted, it feels done.  Add dressing and seasonings to your taste buds' liking, add more veggies when your eyes tell you it looks balanced.


Pasta (tortellini, bowtie and orzo are the 3 I have tried) Dave votes for orzo.
Boil as directed on the package.

4 cups roasted vegetables – cut small (squash, zucchini, green beans, asparagus, onions, bell peppers, )
 (See HERE for further roasting instructions)

1 cup Sun dried Tomatoes and/or 1 cup sliced grape tomatoes

A few hands full of spinach leaves (cut into small pieces with scissors or sharp knife) – don't be afraid of this.  It shrinks into little pieces but adds nice color and "hidden" nutrients!

Cheese (feta or goat) – as much as you like 

Dressing – ½ cup olive oil, 3 garlic cloves minced, minced basil (fresh or dried), Kosher salt and ground pepper to taste. (You can add in other spices – I love the flavor of the Trader Joe's Everyday Seasoning Mill.  It has some red pepper which adds a nice kick). Place all of these ingredients in a jar or measuring cup and stir vigorously until well combined.

Toss all prepared ingredients together (except the dressing) 

Then pour dressing on a little at a time stirring and tasting, until you have the amount of dressing desired.  (You may have some leftover depending on the type and amount of pasta used).
Add seasoning to taste, if needed.  

Serve it as a side dish with a green salad or sandwich, 
make a meal out of it, 
top it with a piece of meat or fish and call it a pilaf, 
serve it chilled and call it a pasta salad,
or eat it with a fork out of the bowl before bedtime and call it Dave's Late-Night Crave.  

tortellini & bow tie version
orzo version


roasting veggies 

roasting other veggies

chopped spinach (which when incorporated shrinks into tiny pieces)


 orzo with different veggies


Roasted Vegetable Hash and Eggs


We have a new favorite dinner that I couldn’t wait to share with you!
It is kind of a merger of these previous posts: Roasted Veggies (HERE and HERE) and Poached Eggs.

Roasted Veggies + Poached (or Fried) Eggs = Vegetable Hash with Eggs

It is super versatile and so tasty! It’s easy and filling.  It’s meatless, but a great main dish, thanks to the egg.  (And if you want or “need” meat, you can crumble bacon on top as a salty, savory garnish.  It ramps it up a bit.)  When I announced the other night that we were having this for dinner, the troops cheered shouts of "hooray!".  I was taken aback that they liked this meal so much.  Dave asked me as I was writing this post, "Why do we like this so much?!" I don't know.  It's just darn good. You just have to see for yourself!


I have made it a few times for the family and have roasted a variety of vegetables: potatoes, sweet potatoes, onions, garlic, bell pepper, carrots, asparagus, zucchini.  So you can use what you have on hand and what you and your people like! (I do think potatoes and onions are essential, though.) And then roasting is just a matter of chopping, tossing in oil, sprinkling with coarse salt and pepper and cooking in a hot oven for a while. 


The only challenge is timing the eggs.  The first time I made it, I wanted to top the hash with poached eggs (read HERE for my journey of learning how to poach an egg). I think the consistency of the poached egg yolk – not liquid-y but thick and creamy- is the right one for the hash.  It creates a creamy sauce.  The complication was trying to poach all 5 eggs for my family at the same time.  I decided that 3 in a pot were all I could handle.  I then proceeded to fry the other 3 on a skillet.  (I made 3 instead of 2 so I could have a back-up egg). The trick is getting them the right yolk consistency.  (I am aware that some people are grossed out by eggs that are runny.  You just have to work through that.  Or prepare a fully cooked egg, if you must). The second time we made this, we decided to make fried eggs, rather than poached, and make them on our large skillet, in hopes that we could simultaneously cook 5 or 6 eggs.   It worked.  I set the table, scooped the veggies into a bowl and had everything ready for when the eggs were done, then served up the eggs on our plates piled with veggies.


Dave is far better at frying eggs than me.  He is the egg-man in the morning.  In fact, he flips the egg in a pan and I’m quite envious of this technique.  I’ve been trying to learn.  After many attempts, leading to half cooked eggs splattered on the toaster oven, in the burners, and on the counter, I have declared that this must be an athletic ability.  Since I am more skilled in the kitchen and he is far more athletically inclined than me, I think it must be a sports-skill.  At least that's what I'm telling myself.
Take a look.

It reminds me of other skills he has that he thinks are “normal” but I deem as extraordinary. Take spitting out the car window while driving down the interstate, for instance.  Have you ever done this? Or throwing the end of a drink out of the window? If you have, you know that it requires skills. Dave is skilled.  When I have tried to spit out of the moving car, I end up getting spit flown back into my hair.  When I try to throw a drink out of my window it flies directly onto (or worse, into) the passenger window.  I just don’t have the skills. I think it's athletic ability.


I am reading a book with my book club, An Everlasting Meal  by Tamar Adler, which is a book about cooking with economy and grace.  It's really interesting.  One chapter is devoted to cooking eggs.  Which is right up my alley, as it seems to be the popular protein at our house these days!  When we can’t figure out what to have for dinner, Asher usually pipes in his suggestion: “What about eggs?”  
In her chapter on eggs, Tamar writes, "For my taste, meals still qualify as meals if they are eggless.  But an egg can turn anything into a meal and is never so pleased as when it is allowed to." I'm beginning to agree with her.

We like topping the hash and eggs with some freshly grated parmesan cheese. 


"crusty" bread
We also like serving this dish with "crusty" bread- it's great for sopping up the egg and scooping up the vegetables. 


 I served a little fruit on the side for the kids and a side of fancy greens and grape tomatoes tossed in a little oil and vinegar for the adults.


Here's a printable recipe, but basically: Roast some veggies.  Cook an egg- fry it, poach it, flip it – you choose. Place it on top of your veggies.  Add any garnishes you like and enjoy a fresh, easy, savory meal!

So, what's your egg technique? Do you have any egg flippin' skills? I'd love to hear!  Have you tried Roasted Vegetable Hash and Eggs at home or at a restaurant? Enjoy!

To Substitue or Not to Substitute?


I am a believer in substituting.  I often replace a name brand thing or a fatty thing, with something less costly, caloric or prestigious.  In recipes,  I love finding cheaper, healthier ingredients to use.  
Sometimes substitutions work and other times they just don’t measure up.  There are some ingredients for which the generic just aren’t comparable to the brand name, others are equally good.  In recipes, it's sometimes trial and error.  For example: I think yogurt is a great substitution for butter in muffins, while I think applesauce in cookies alters them too severely.  

Sometimes you have to learn the hard way.  Which reminds me of middle school.  Do you remember being a middle schooler?  It’s just brutal.  No matter who you are or where you are from, it’s just awkward. And kids are mean. And insecure (I now understand).  My parents have always been very practical and prudent with their money. This trait is one I admire greatly.  I can remember my father talking to me about name brands when I was a growing up.  He would challenge me to consider that if the same exact shirt, when store brand, was $10, and yet was $38 if it was Polo brand, then I actually was paying $28 for that little embroidered man riding on a horse.   This made sense and I agreed that there wasn’t a difference anyway!

However, when I was in Middle School, I really wanted to get a pair of Docksiders.


Did you ever have Docksiders? They were all the rage back in the 80s when I was a teenager. I really wanted them.  I remember shopping with my dad to see if we could find some. Then my Dad found some at J C Pennys that were a knock off. They were significantly less expensive and my dad argued that they were just the same.  I tried to agree, but I knew deep down inside that they really weren’t Docksiders.  But I wasn’t paying for them, after all.  So, to home we went with the knock off docksiderish shoes. 

When I wore them to school the next week, my fears were realized.  My mean classmates began to make comments about my knock off brand shoes.  Flush-faced and devastated, I began to sit cross ankled, so as to hide the labels that were glaring on the outside of each of my shoes.  I am not sure how much I ended up wearing those shoes.  This was one of those situations, where I have to agree with Marvin Gaye and Tami Terrell – Ain't nothing like the Real thing, baby.

So, a few weeks ago, I saw this incredible looking Carmelita Bar on Pinterest. (If you haven’t found pinterest, and you like beautiful things and collecting ideas, you should totally check it out). I pinned it and added it to my “Yum” board.  I was needing to make a dessert for our Social Work Chili Supper and was thinking it might fit the requests of my students: yummy, gooey, chocolate and no nuts.  So I made it.  It was everything and MORE than what I hoped it would be.  Carmelitas.  Layers of brown sugar/butter/oat bar cookie with thick, melted carmel, and semi-sweet chocolate in-between.  YUM!

Carmelita means "little caramel" and though you might cut them in small pieces, there's nothing really "little" about these bars.  I am thinking "Carmelgrande" might be a better name for them.

So when my mother was coming to town last week, I wanted to make them for her. I thought I would try substituting my 1% milk for the whipping cream used to liquefy the caramels.  I thought, “milk’s milk…and the caramels are so rich it will be okay”.  I thought with all of that butter, chocolate and caramel, the heavy cream was perhaps unnecessary.

But I was wrong. It wasn’t the same.  It was far thinner and when cooled, it was less rich-tasting.  Now, don’t get me wrong, my mom and sister, who tested them, thought they were fabulous, but when Amy and Dave, who had tasted the first batch as well, compared the two,  they wholeheartedly agreed that the caramel flavor was diminished with the milk in the second batch. 

So, I decided to make them one more time, just to make sure! (I didn’t want to give up too soon) and tried it with half and half.  It was much creamier than the milk, but still not as “wow” as the heavy cream.  So, I say, if you are trying to be healthy, make them as directed and just eat one –  share the rest with your friends, family, neighbors, co-workers, but don't compromise on the ingredients.  In this case..."to NOT SUBSTITUTE" is the answer!


Lucy and I unwrapped and counted - educational yumminess

Carmelitas

3/4 cup butter, melted
3/4 cup brown sugar, packed
1 cup flour
1 cup oats (old fashion rolled oatmeal)
1 tsp. baking soda
32 caramel squares, unwrapped
1/2 cup heavy cream
6 ounces semisweet chocolate chips (about a cup)

In a bowl, combine melted butter, brown sugar, flour, oats, and baking soda.  Pat half of the oatmeal mixture into the bottom of a lightly sprayed 8 x 8 pan.  Bake at 350 degrees for 10 minutes.  
Meanwhile...


Unwrap caramels and combine them with cream in a saucepan over low heat (or in a bowl in the microwave). Stir and cook until completely smooth.  Set aside. 


Remove pan from oven and sprinkle chocolate chips evenly over the warm bars.


Pour melted caramel over chocolate chips.

Crumble the remaining oatmeal batter over
caramel.


Return to oven and bake an additional 15-20 minutes, until the edges are lightly browned.

Remove from oven and cool completely before cutting. (It's tempting to not wait, but they really need to be cooled! You can put it in the fridge for a few minutes to help speed this up, if you need).

Slice and serve.
(They are very rich, so slice small!)

[I doubled the recipe and baked it in a 9 X 13 pan in these photos.]

Bran Muffins (Dirt & Stick Muffins)

If I had to choose one baked good to make, it would be muffins.  They are so easy, versatile and tasty. Since breakfast is my favorite meal of the day, I love that they are a main-course baked good! I appreciate creative, unique muffins and simple classic ones as well.  It's great when you find a quality, basic muffin recipe that you can then add to and tweak depending on your mood.  Furthermore, I think muffins are a great treat to share with people:
with my kids' teachers at school to start their day,
with my college students to offer some homemade goodness,
with my neighbors on a saturday morning to celebrate the weekend,
or a new parent who's been up all night,
or struggling friend who needs some kindness and nourishment,
or a child, because they are so fun to eat!

My former student, Amy, who is now in Colorado in grad school, sent me this NPR article about showing compassion through the gift of food.  If you have a couple of minutes, you should read it. It's inspiring! Thanks, Amy, for thinking of me!
(Speaking of my college students, my student Becca, surprised our 9:30 class this week with a gift of very special pumpkin cream cheese streusel muffins.  They were deliciously fall!  I ate one at class and another for lunch.  Here's the recipe.)

the Bran. You can find it in the health
food aisle of the grocery
Muffins come in all flavors and sizes.  I love a cupcake-like muffin, I mean, how could I not?  It's like a license to eat cake for breakfast! But bran muffins are at the top of my list.  When I'm reaching for a muffin at a bakery, I usually go for a bran muffin.  This bran muffin recipe is my favorite for a hearty, whole grain, rusky muffin.  Dave calls them my "dirt and stick muffins" because they have real wheat bran in them and they feel healthy (though still moist and yummy)!

I have some history with bran muffins.  My mom raised us on raisin bran muffins, which are really tasty, easy to make, and are perfect for those reluctant-to-eat-bran people.  They are fluffy and sweet (lots of sugar in this recipe) and light in their color and texture. If that is the bran muffin that sounds appealing to you, here is the recipe.

If you are more of a hearty, denser, healthier muffin, this one is for you.

In both recipes, the batter is able to be kept in the fridge up to a few weeks, so that you can bake a few of them fresh each day.   (The Raisin Bran ones actually require refrigeration for 6 hours prior to baking them – which for me just means that I mix the batter at night and let it refrigerate for the 6 hours I sleep and it's ready when I wake up; the Hearty Bran don't require refrigeration before baking).

I have tried many mix-ins with these: craisins, blueberries, raisins, apples, pears, walnuts, pecans, peaches, you name it.  A local favorite coffee shop, The Frothy Monkey, has daily muffins and they usually have a bran of some creative variety – i've had mango pineapple bran, blueberry bran, prune bran, and last week they had apricot almond bran.

[I have posted several muffin recipes on this blog, click on THIS ONE that has my tricks and tips that I have learned along the way to help with your muffin-baking pursuit]

1 cup bran soaking in hot water
the batter
3 cups Unprocessed Wheat Bran
1 cup boiling water
1 cup brown sugar
½ cup butter, softened (or I sometimes use ¼ cup vanilla yogurt; ¼ cup butter)
2 ½ cups All-purpose flour (or I sometimes use 1 cup whole wheat/ 1 ½ cups white wheat)
2 tsp. baking soda
1 tsp. salt
2 eggs, beaten
2 cups buttermilk
¼ cup honey
Any "mix-ins" you would like (craisins, blueberries, nuts, etc)

Mix 1 cup of wheat bran with 1 cup boiling water; stir and let water absorb into bran.  
In a bowl, blend sugar and butter.  
Measure and combine flour, baking soda and salt.  
Combine the moist bran with the beaten eggs, the remaining 2 cups of bran, buttermilk, blended sugar/butter mixture, and the dry ingredient mixture.  
Stir until well blended.  
Add ¼ cup honey and any “mix-ins” you would like.
Place in refrigerator for future use, OR bake at once - (If you are going to wait to make the muffins until later, I think it is best to omit the mix-ins until the time you are baking them).

batter in the fridge for whenever you want to bake them
Preheat oven to 400 degrees.  
Stir batter and scoop into greased muffin tins. I like to sprinkle some turbinado sugar (coarse raw sugar) on top before baking.  If I used a "mix-in", I sprinkle some of those ingredients on top to indicate what's inside, and because it's so pretty!  
Bake 15 minutes, or until done.  


Keep remaining mixture in airtight container for 2 to 4 weeks.  Makes about 2 dozen muffins.


Happy Friday muffins for teachers

Older Post ►
 

Copyright 2011 from my home to yours is proudly powered by blogger.com